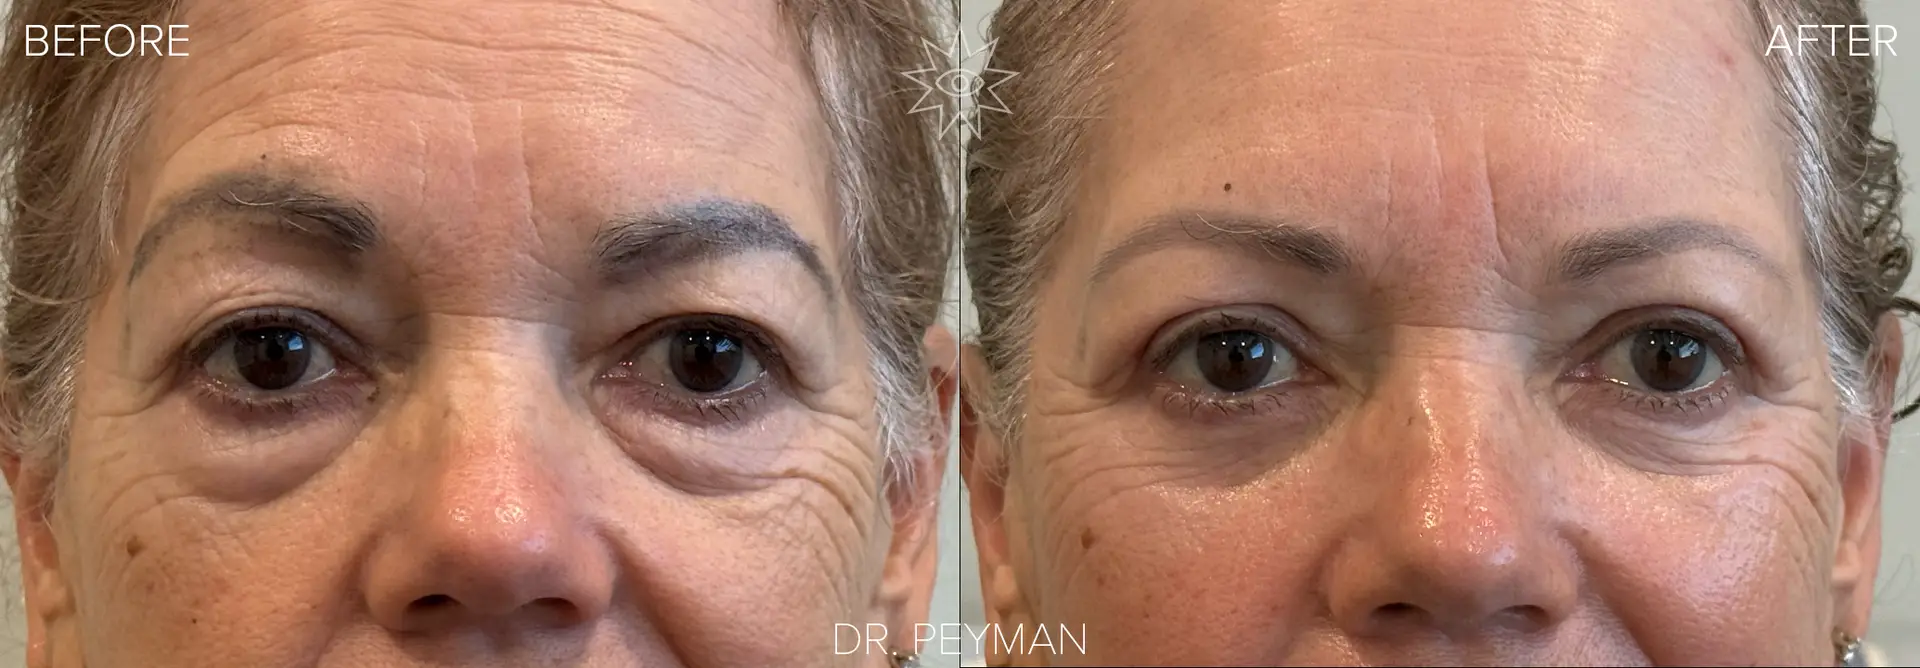
Phase 1: Pre-Operative Preparation (Days/Weeks Before Surgery)
Consultation & Consent: You’ve already discussed goals, risks, benefits, and the specific plan with your surgeon.
Medical Clearance:
You’ll receive instructions to visit your Primary Care Physician (PCP).
Your PCP will review your medical history, current medications, allergies, and perform a physical exam including vitals.
The goal is to ensure you are medically stable for an office-based procedure under local anesthesia with oral sedation. Your PCP will sign a “clearance” form stating no significant medical contraindications exist.
Pre-Operative Instructions: You’ll receive detailed written instructions covering:
Medications to STOP: Typically 1-2 weeks before:
Aspirin, NSAIDs (Ibuprofen, Naproxen), blood thinners (consult PCP/surgeon about prescription blood thinners to ensure it is safe to hold before surgery).
Certain supplements: Fish Oil, Vitamin E, fish oil, Ginkgo, Garlic, Ginseng, St. John’s Wort – anything that can increase bleeding).
Medications to CONTINUE: Usually essential meds such as blood pressure, heart, breathing, and diabetic medications. The goal is to ensure that the blood pressure and blood sugar are normal a the time of surgery. Smoking Cessation: Strictly avoid smoking/vaping for at least 2 weeks before and after.
Alcohol Avoidance: Stop alcohol 48-72 hours before and after surgery.
Eating on the day of the procedure: Because most blepharoplasties are performed in the office under local anesthesia, patients are encouraged to have breakfast the morning of surgery.
Arrival: Patients are scheduled to come in 30 minutes before the procedure to take oral sedatives like valium and to mark the eyelids before surgery.
Escort:MUST have a responsible adult driver to take you home and ideally stay with you for the first 24 hours (due to Valium effects).
What to Wear/Bring: Comfortable, loose-fitting top (button-down preferred), no makeup/jewelry, bring glasses (can’t wear contacts), payment if required.
Hygiene: Shower and wash your face/hair thoroughly the morning of surgery. Don’t apply lotions/makeup.
Phase 2: Day of Surgery – Arrival & Preparation
Check-In: Arrive at the office.
Blood pressure check
Medication Administration:
Oral Sedation: You’ll be given 1-2 Valium tablets to swallow with a small sip of water. This happens 30 minutes before the procedure starts to allow time for it to take effect (relaxation, reduced anxiety, mild amnesia).
Possible Additional Oral Meds:Sometimes an oral painkiller (like hydrocodone) will be given alongside the Valium if the patient has taken a similar medication before and knows they tolerate it well. Ask your surgeon specifically if you’ll receive anything else.No IV will be started.
Marking: Your surgeon will carefully mark the planned incision lines on your eyelids while you are sitting/upright.
Phase 3: During the Surgery (Approx. 1-2 Hours)
Positioning: You’ll lie comfortably on the operating table.
Initial Local Anesthesia Injections and prepping the skin:
The surgeon will inject the lidocaine with epinephrine under the skin in the marked areas of your eyelids.
You will feel a little burning during these initial injections. The distraction provided by our surgical tech and the Valium helps you tolerate the injection.
The area will start to feel numb very quickly following the injection.
The periocular area will be prepped and draped in sterile fashion.
Surgery Begins:
Once numb, the surgeon makes the incisions along the natural creases of your upper eyelids.
You will likely feel some pressure, pulling, and movement, but should not feel sharp pain.
Surgical Technique:
As the surgeon works deeper (through skin, muscle, towards the fat pads – the “compartments”), they will periodically check if you feel any sensation.
Before working on a deeper layer (compartment), they will inject a small amount of the same local anesthetic mixture directly into that specific area.
This ensures each layer is fully numb before it’s manipulated, maximizing comfort. These top-up injections are usually much less noticeable than the initial ones.
Surgical Steps: The surgeon will remove or reposition excess skin, muscle, and/or fat as planned. Bleeding points are carefully cauterized.
Closure: Fine sutures (stitches) or surgical glue are used to close the incisions. Antibiotic ointment is applied.
Communication: You are awake but sedated. If you feel ANY sharp pain at ANY point, tell the surgeon immediately so they can give more local anesthetic.
Phase 4: Immediate Post-Op (In Facility)
Recovery Area: You’ll be helped to sit up slowly and then moved to a recovery chair/area.
Initial Monitoring: Staff will check your comfort level and check vitals if needed. Vision might be slightly blurry initially (ointment, swelling).
Cold Compresses: Ice packs or cold compresses will be applied gently to your eyes to reduce swelling.
Post-Op Instructions Review: A nurse will verbally review your discharge instructions you received at the preoperative appointment. Key points include:
Medications: Prescription for pain meds (often Acetaminophen/Tylenol or Tylenol with Codeine) + Antibiotic ointment. Instructions for OTC meds like Arnica (for bruising).
Cold Compresses: How often and for how long (e.g., 15-20 mins every hour while awake for first 24-48 hrs).
Head Elevation: Sleep with head elevated on 2-3 pillows for 1-2 weeks.
Activity Restrictions: No bending, heavy lifting, straining, swimming, or strenuous exercise for 1-2 weeks. Avoid rubbing eyes.
Wound Care: Apply the prescribed antibiotic eye ointment 4x/day along the upper eyelid stitches.
Showering: Avoid direct heat and water pressure to the face for 2 weeks. Washing the hair from the back after 2 days is okay.
Follow-Up: Date and time of your first post-op appointment (usually within a week).
Red Flags: Symptoms requiring immediate call to the surgeon (e.g., sudden severe pain, vision loss, significant bleeding, signs of infection like fever/redness/pus).
Discharge: Your escort will take you home after a short recovery period. You cannot drive yourself.
Phase 5: Recovery at Home
Follow all written instructions meticulously.
Take tylenol as needed for pain.
Apply cold compresses frequently.
Keep head elevated.
Walking, television, desk work okay as long as eyes don’t feel stained
Attend all follow-up appointments.
Be patient – swelling and bruising peak around days 2-3 and gradually subside over weeks.